> ## Documentation Index
> Fetch the complete documentation index at: https://docs.atonom.ai/llms.txt
> Use this file to discover all available pages before exploring further.
# Entra Integration for Atonom
> Setting up SAML single sign-on (SSO) for the Atonom application using a non-gallery configuration in your Microsoft Entra tenant.
This guide will walk you through the process of configuring SAML-based single sign-on (SSO) for the Atonom application within your Microsoft Entra ID tenant. This process involves creating a non-gallery enterprise application, configuring the necessary SAML parameters, and assigning users.
***
### **1. Create the Enterprise Application**
Since Atonom is not yet in the main Entra App Gallery, you will first need to create a new non-gallery application.
1. Sign in to the **Microsoft Entra admin center** as at least a `Cloud Application Administrator`.
2. Browse to **Identity > Applications > Enterprise applications**.
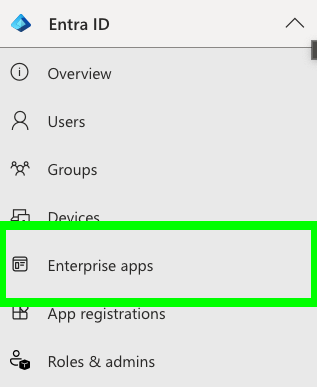 3. Select **+ New application**.
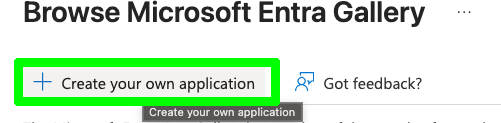
 4. On the "Browse Microsoft Entra Gallery" page, select the **+ Create your own application** button at the top.
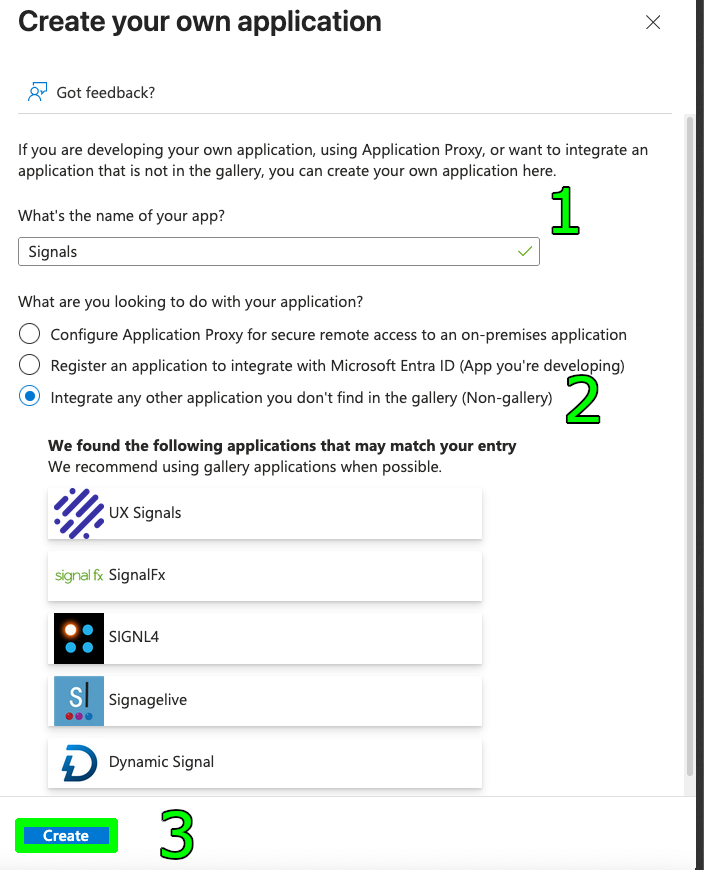
 5. A pane will appear on the right. In the "What's the name of your app?" field, enter `Atonom`.
6. Select the option **Integrate any other application you don't find in the gallery (Non-gallery)**.
7. Click **Create**. Please wait a moment while the application is created and added to your tenant.
5. A pane will appear on the right. In the "What's the name of your app?" field, enter `Atonom`.
6. Select the option **Integrate any other application you don't find in the gallery (Non-gallery)**.
7. Click **Create**. Please wait a moment while the application is created and added to your tenant.
 ***
### **2. Get Atonom Service Provider Metadata**
1. Go to the Atonom **[Identity Management](https://app.getsignals.ai/#/v2/settings/saml)** page and keep this open in a separate tab.
### **3. Configure SAML Single Sign-On**
Once the Atonom application has been created, you will be taken to its overview page.
1. In the **Manage** section of the left menu, select **Single sign-on**.
***
### **2. Get Atonom Service Provider Metadata**
1. Go to the Atonom **[Identity Management](https://app.getsignals.ai/#/v2/settings/saml)** page and keep this open in a separate tab.
### **3. Configure SAML Single Sign-On**
Once the Atonom application has been created, you will be taken to its overview page.
1. In the **Manage** section of the left menu, select **Single sign-on**.
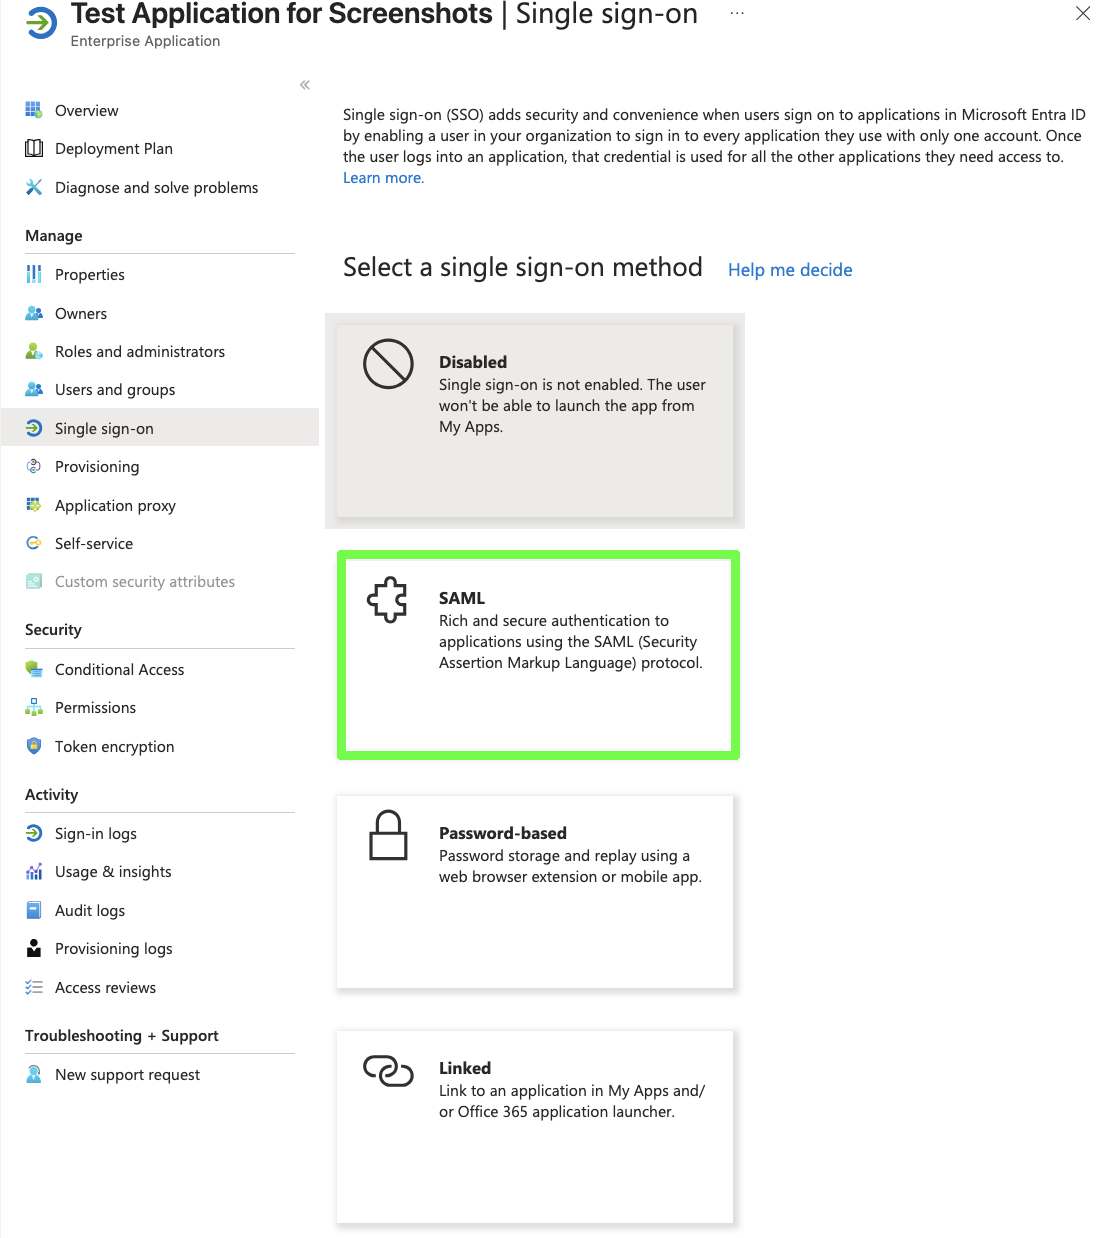
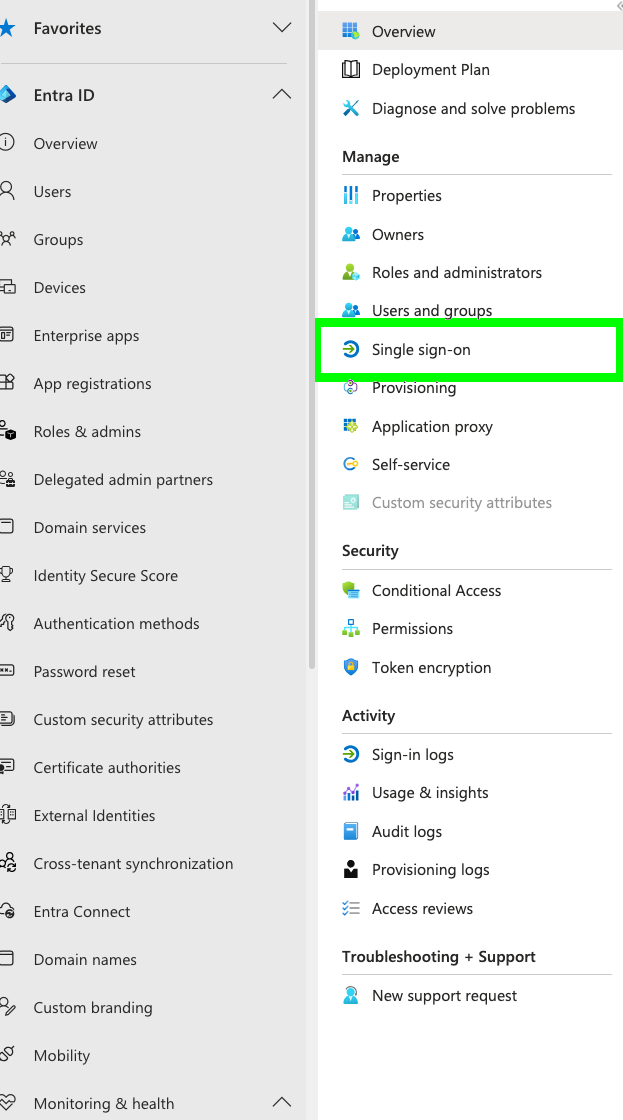 2. On the "Select a single sign-on method" page, choose the **SAML** tile. This will open the SSO configuration page.
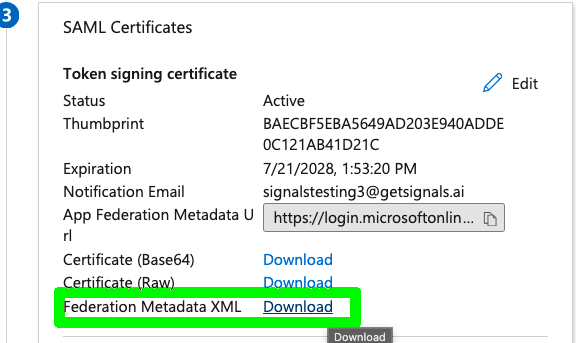
 3. Scroll down to the **SAML Certificates** section and click **Download** next to the **Federation Metadata XML** button.
 4. Go to the Atonom **[Identity Management](https://app.getsignals.ai/#/v2/settings/saml)** page and check "Upload XML Directly" then paste the contents of the **Federation Metadata XML** file into the text area labelled **Metadata XML**.
#### **A. Basic SAML Configuration**
These settings define where Atonom sends and receives SAML messages.
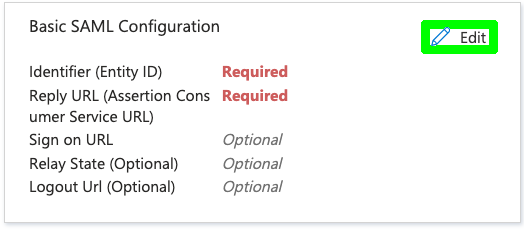
1. In the **Basic SAML Configuration** section, select the **Edit** (pencil) icon.
4. Go to the Atonom **[Identity Management](https://app.getsignals.ai/#/v2/settings/saml)** page and check "Upload XML Directly" then paste the contents of the **Federation Metadata XML** file into the text area labelled **Metadata XML**.
#### **A. Basic SAML Configuration**
These settings define where Atonom sends and receives SAML messages.
1. In the **Basic SAML Configuration** section, select the **Edit** (pencil) icon.
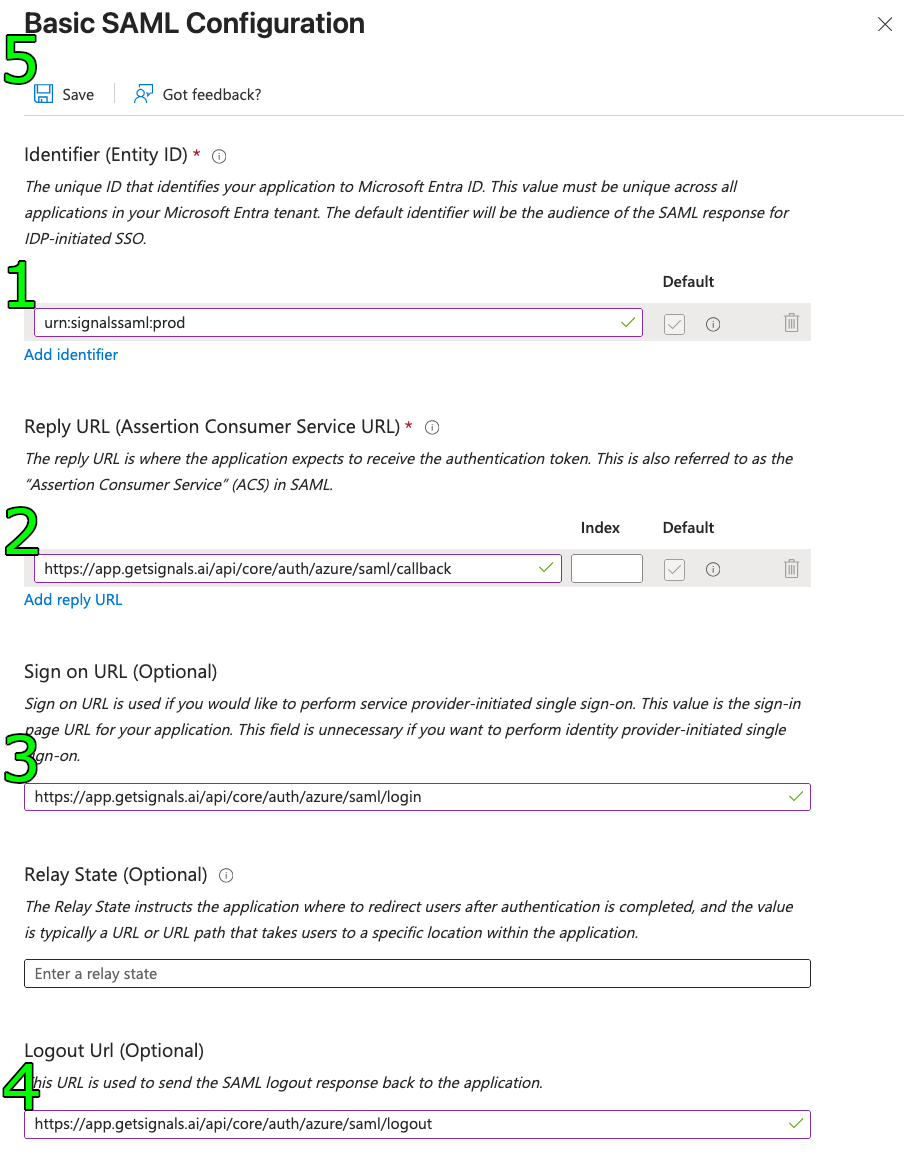
 2. Configure the following fields using values from Atonom **[Identity Management](https://app.getsignals.ai/#/v2/settings/saml)** page:
* **Identifier (Entity ID)**: Click **Add identifier** and enter the `Entity ID / Issuer` value from Atonom **[Identity Management](https://app.getsignals.ai/#/v2/settings/saml)** page.
* **Reply URL (Assertion Consumer Service URL)**: Click **Add reply URL** and enter the `Assertion Consumer Service (ACS) URL`.
* **Sign on URL**: Enter the `Atonom SAML Login URL` value.
3. Select **Save** at the top of the pane.
2. Configure the following fields using values from Atonom **[Identity Management](https://app.getsignals.ai/#/v2/settings/saml)** page:
* **Identifier (Entity ID)**: Click **Add identifier** and enter the `Entity ID / Issuer` value from Atonom **[Identity Management](https://app.getsignals.ai/#/v2/settings/saml)** page.
* **Reply URL (Assertion Consumer Service URL)**: Click **Add reply URL** and enter the `Assertion Consumer Service (ACS) URL`.
* **Sign on URL**: Enter the `Atonom SAML Login URL` value.
3. Select **Save** at the top of the pane.
 #### **B. SAML Certificates**
Atonom automatically downloads and validates your Entra ID signing certificate from the federation metadata endpoint. No manual certificate upload is required on the Atonom side.
1. In the **SAML Certificates** section, ensure there is an active certificate
2. Note the certificate details for troubleshooting purposes if needed
#### **C. Configure User Attributes & Claims (Required)**
⚠️ **Important**: The attribute names must match exactly what Atonom expects or authentication will fail.
1. In the **Attributes & Claims** section, select the **Edit** (pencil) icon.
2. The `Unique User Identifier (Name ID)` should be set to `user.userprincipalname` by default, which is sufficient.
3. Ensure the following **Additional claims** exist with these exact names. If not, select **+ Add new claim** to create them:
* **Name:** `http://schemas.xmlsoap.org/ws/2005/05/identity/claims/emailaddress` | **Source:** `Attribute` | **Source attribute:** `user.mail`
* **Name:** `http://schemas.xmlsoap.org/ws/2005/05/identity/claims/givenname` | **Source:** `Attribute` | **Source attribute:** `user.givenname`
* **Name:** `http://schemas.xmlsoap.org/ws/2005/05/identity/claims/surname` | **Source:** `Attribute` | **Source attribute:** `user.surname`
4. Select **Save**.
***
### **4. Configure Atonom Environment**
#### **Calendar Access Security Group (Optional)**
If you want to restrict who can connect calendars, create a dedicated security group in your Entra tenant and use that group's ID in Atonom.
1. In Microsoft Entra ID, create a new **Security group** for calendar access.
2. After the group is created, copy the group's **Object ID**.
3. Ensure the Atonom Entra app is given access to `user.groups` so Atonom can evaluate group membership.
4. In Atonom's **Identity Management** page, paste that group ID into the **Calendar Access** input.
Only users assigned to that Entra security group will be able to connect their calendar to Atonom.
Already signed-in users will need to re-authenticate for their roles to be considered.
***
### **5. Assign Users and Groups**
By default, no one in your organization can use the new application. You must assign specific users or user groups who should have access to Atonom.
1. Navigate to your **Atonom** enterprise application in Entra ID.
2. In the **Manage** section of the left menu, select **Users and groups**.
3. Select **+ Add user/group**.
4. Under **Users**, click "None Selected" and choose the appropriate users or groups from the list.
5. Click **Select** and then **Assign**.
⚠️ **Important**: Users must have pending invites in the Atonom system to successfully log in via SAML. See the [User Invitation Guide](/SAML/invite-users) for details on inviting users to Atonom.
***
### **6. Test Single Sign-On**
After configuration is complete and you have assigned users:
1. On the Identity Management page, copy the **Atonom SAML Login URL** and paste it into a new tab.
2. Follow the prompts.
3. If you have an invite pending to the email you've signed in with, and that email is assigned to the active directory, you should be redirected to the Atonom new user onboarding.
***
### **7. Available SAML Endpoints**
For reference, you can always check Atonom SAML endpoints in the **[Identity Management](https://app.getsignals.ai/#/v2/settings/saml)** page.
***
### **8. Troubleshooting**
If you encounter issues, check these common configuration problems:
* **User Cannot Log In (Error `AADSTS50105`)**: This error means the user trying to sign in has not been assigned to the application. Follow the steps in the **Assign Users and Groups** section to grant them access.
* **"No pending invite found" Error**: Users must have a pending invite in the Atonom system. See the [User Invitation Guide](/SAML/invite-users) for details on inviting users to Atonom.
* **Claim Mapping Errors**: Verify that the user attribute claims in step 3C use the exact URIs specified. Incorrect claim names will cause authentication failures.
* **Entity ID Mismatch**: Ensure the **Identifier (Entity ID)** in Entra ID exactly matches the `entityID` from your Atonom metadata endpoint.
* **Redirect URI Mismatch**: Ensure the **Reply URL** in Entra ID exactly matches the `AssertionConsumerService` location from your Atonom metadata.
* **Certificate Validation Errors**: Atonom automatically downloads your Entra ID certificate. If issues persist, check that your Entra ID certificate is active and valid.
* **Logout Issues**: Verify the **Logout URL** matches the `SingleLogoutService` location from your Atonom metadata.
* **Session Management**: Atonom uses Redis for session storage. Logout requests will invalidate both the SAML session and the application session cookie.
***
### **9. Security Notes**
* Atonom validates SAML assertions using your Entra ID's signing certificate
* All SAML requests from Atonom are signed for security
#### **B. SAML Certificates**
Atonom automatically downloads and validates your Entra ID signing certificate from the federation metadata endpoint. No manual certificate upload is required on the Atonom side.
1. In the **SAML Certificates** section, ensure there is an active certificate
2. Note the certificate details for troubleshooting purposes if needed
#### **C. Configure User Attributes & Claims (Required)**
⚠️ **Important**: The attribute names must match exactly what Atonom expects or authentication will fail.
1. In the **Attributes & Claims** section, select the **Edit** (pencil) icon.
2. The `Unique User Identifier (Name ID)` should be set to `user.userprincipalname` by default, which is sufficient.
3. Ensure the following **Additional claims** exist with these exact names. If not, select **+ Add new claim** to create them:
* **Name:** `http://schemas.xmlsoap.org/ws/2005/05/identity/claims/emailaddress` | **Source:** `Attribute` | **Source attribute:** `user.mail`
* **Name:** `http://schemas.xmlsoap.org/ws/2005/05/identity/claims/givenname` | **Source:** `Attribute` | **Source attribute:** `user.givenname`
* **Name:** `http://schemas.xmlsoap.org/ws/2005/05/identity/claims/surname` | **Source:** `Attribute` | **Source attribute:** `user.surname`
4. Select **Save**.
***
### **4. Configure Atonom Environment**
#### **Calendar Access Security Group (Optional)**
If you want to restrict who can connect calendars, create a dedicated security group in your Entra tenant and use that group's ID in Atonom.
1. In Microsoft Entra ID, create a new **Security group** for calendar access.
2. After the group is created, copy the group's **Object ID**.
3. Ensure the Atonom Entra app is given access to `user.groups` so Atonom can evaluate group membership.
4. In Atonom's **Identity Management** page, paste that group ID into the **Calendar Access** input.
Only users assigned to that Entra security group will be able to connect their calendar to Atonom.
Already signed-in users will need to re-authenticate for their roles to be considered.
***
### **5. Assign Users and Groups**
By default, no one in your organization can use the new application. You must assign specific users or user groups who should have access to Atonom.
1. Navigate to your **Atonom** enterprise application in Entra ID.
2. In the **Manage** section of the left menu, select **Users and groups**.
3. Select **+ Add user/group**.
4. Under **Users**, click "None Selected" and choose the appropriate users or groups from the list.
5. Click **Select** and then **Assign**.
⚠️ **Important**: Users must have pending invites in the Atonom system to successfully log in via SAML. See the [User Invitation Guide](/SAML/invite-users) for details on inviting users to Atonom.
***
### **6. Test Single Sign-On**
After configuration is complete and you have assigned users:
1. On the Identity Management page, copy the **Atonom SAML Login URL** and paste it into a new tab.
2. Follow the prompts.
3. If you have an invite pending to the email you've signed in with, and that email is assigned to the active directory, you should be redirected to the Atonom new user onboarding.
***
### **7. Available SAML Endpoints**
For reference, you can always check Atonom SAML endpoints in the **[Identity Management](https://app.getsignals.ai/#/v2/settings/saml)** page.
***
### **8. Troubleshooting**
If you encounter issues, check these common configuration problems:
* **User Cannot Log In (Error `AADSTS50105`)**: This error means the user trying to sign in has not been assigned to the application. Follow the steps in the **Assign Users and Groups** section to grant them access.
* **"No pending invite found" Error**: Users must have a pending invite in the Atonom system. See the [User Invitation Guide](/SAML/invite-users) for details on inviting users to Atonom.
* **Claim Mapping Errors**: Verify that the user attribute claims in step 3C use the exact URIs specified. Incorrect claim names will cause authentication failures.
* **Entity ID Mismatch**: Ensure the **Identifier (Entity ID)** in Entra ID exactly matches the `entityID` from your Atonom metadata endpoint.
* **Redirect URI Mismatch**: Ensure the **Reply URL** in Entra ID exactly matches the `AssertionConsumerService` location from your Atonom metadata.
* **Certificate Validation Errors**: Atonom automatically downloads your Entra ID certificate. If issues persist, check that your Entra ID certificate is active and valid.
* **Logout Issues**: Verify the **Logout URL** matches the `SingleLogoutService` location from your Atonom metadata.
* **Session Management**: Atonom uses Redis for session storage. Logout requests will invalidate both the SAML session and the application session cookie.
***
### **9. Security Notes**
* Atonom validates SAML assertions using your Entra ID's signing certificate
* All SAML requests from Atonom are signed for security